 Have you ever found yourself wasting time and getting frustrated because you can’t find something on your computer?
And what if you don’t have your computer with you? Can you pull up that photo on your mobile device that you’d like to show off?
Wouldn’t it be nice if you were so efficient and organized that you don’t even have to think about how to find something?
You may not be able to get to the level of efficiency that you’re working like an automaton, but there’s probably lots of room for improvement. If you’re someone who has file icons littering your desktop or hundreds of photos still on your smartphone and not organized in any way, then read on!
Start with defining your organized system.
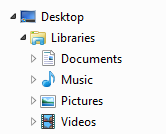 Your operating system creates some high-level organization for you – a Documents library, a Photos library, a Videos library, and a Music library. When you save a document, import photos, or purchase music, these folders are initially used by default by your applications. (However, your applications will usually change the default to the last folder used, so if you’ve saved something to your desktop, you may be saving everything after that to the desktop without realizing it.) Use these default folders as a start for your organization system.
You have three options when organizing your documents:
- Create file folders by function. For example, you may have a file folder for Personal, with sub-folders for Finance, Kids, etc. You may then have another top-level folder for Business, with sub-folders for Clients, Marketing, Taxes, etc.
- Create file folders by type – for example, a folder called Marketing, with sub-folders for Presentations, Brochures, etc.
- Use a tool that organizes by function, but that combines documents, media, emails, etc. Evernote is a good example of this and you can read about it here: User Evernote For a New Level of Organization.
Some software programs that work with media (music, photos, and videos) may use libraries (see my blog post here about libraries: What Everyone Ought to Know About Digital Music and Photos) that contain information about the media (such as keywords, album, genre, etc.) as well as the media file itself. It’s best to work within those programs to organize the media. For example, if you use the Photos program on the Macintosh, you can create folders and albums for your photos. You can also assign keywords to help you search for those photos later.
Once you have a good organization in place, make sure that you use that system whenever you download or save a new document and whenever you add new media. If you use a cloud service like Dropbox or iCloud Drive, then you’ll also be able to pull up whatever you need on your mobile device as well – just create your organization system in the Dropbox folder or iCloud Drive folder. (You can find your Dropbox folder listed under “Favorites” in a Windows Explorer window, and your Dropbox or iCloud Drive folder under “Favorites” in a Macintosh Finder window.)
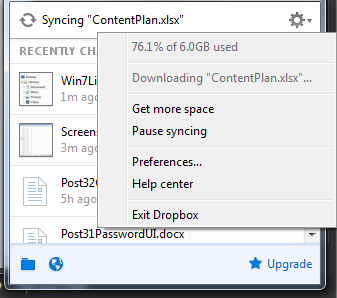 Here’s how to check that you have enough storage space in your cloud service:
- Windows: Click on the Dropbox icon in the far right of your taskbar and then click on the arrow to the right of the gear icon.
- Macintosh:
- Dropbox – click on the Dropbox icon in the menu bar at the top and then click on the arrow to the right of the gear icon.
- iCloud Drive – you can check your iCloud storage space by going to System Preferences and iCloud, then view your available storage at the bottom.
Remember that your cloud storage ALSO takes up the same amount of space on your computer because it’s a cloud synchronization service, not a backup service. Also remember that deleting a file on one device will delete it from the cloud and from all of your other devices. (iCloud Photo Library works the same way.)
You should also be keeping an eye on your storage space. You can read my blog post here: 6 Tips for Managing Your Computer Storage.
Get the “Controlling the Chaos” Newsletter and receive a free PDF download
“Drowning in Email – A Lifeline for Communications Overload”


